
Bookshelf Desk
Papa here!
So, apparently the Pinning Summer fan base has been waiting on pins (ha ha!) and needles for this one. It is the bookshelf desk as seen here.
As with other projects, we re-purposed parts of old furniture to complete this pin. I had an old computer workstation desk that I had taken apart years ago, but kept the wood. It was one of those build-it-yourself desks that came in a flat cardboard box, so the wood is all particle board, but pretty sturdy since it was a desk. It matched almost perfectly with the bookshelf that we would be using to create this desk combo.
I started out by removing the center shelf, which is one of the “fixed position” support shelves. If you have ever built one of these bookshelves, you know the cam-style screws that these systems use… very nice for putting back together or moving to a new piece altogether.

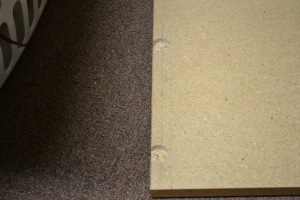
I measured the width of the shelf and drew my cut lines on the bottom of the desktop. Then, I carefully measured where the holes needed to go for the cam-screw thingies. Using my newly acquired 1-inch forstner bit and my drill depth guide, I made 4 holes that would fit the little plastic pieces.

Then, it was off to the table saw (ok, I simply turned around and there it was).
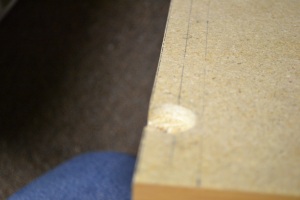
It may look like I cut the side of the holes off. I did because as you can see, the cam-screw thing fits it just right and the screw will come out the side and into the bookshelf’s uprights.

Now that the desktop is prepared, I needed to support the front of the desk, as it sticks out of the case by 10-12 inches. If 007 put his books or laptop on it, there was the strong probability that it would flip up in the back and there would be no more desk. So, we needed legs. I did not have any good leg material, so I went to Home Depot and, for $4.00 I got two spindles that would normally go into a railing. I cut them to the height of the desk, minus 3/4-inch for adjustable feet (our house isn’t, shall we say, level). I found the center of the legs by drawing diagonals and drilled holes to fit the feet.


Getting closer!!
I wanted to match the color of the shelf, so I mixed some poly-stain with a darker stain until I got the desired color and stained the legs. Pretty darned close to the same color!!! I let them hang to dry overnight.


When it dried, I did a light sanding.
I next pulled out one of my favorite tools: the pocket-hole jig. It makes really strong joints.
I attached the legs to the bottom with 2 screws each. It may not stop a truck, but will do very nicely to support the weight of a 7-yr old and his school supplies.


Final assembly…
I placed the cam-screw thingies in the appropriate holes, screwed them into the side walls and Mama put the remaining shelves in. She then unloaded the school supplies that we have for 007 next year onto his brand new desk. It’s going to be a great school year!


But there are still 29 pins to go for the summer.

July 31, 2014 at 7:16 am
We have some of the same school supplies!
July 31, 2014 at 8:12 am
Really? 😉
July 31, 2014 at 5:31 pm
So creative!!!! Did you anchor it to the wall then? I just ask cuz sometimes your stories of 007 reminds of stories of my Dr. D. And anchors were necessary for him. Bubble wrap would have been nice too. But anchors, yes 🙂
July 31, 2014 at 8:10 pm
Ha! We did not anchor it, but be did run through a list of things he’s “not allowed to do” to the desk. Hopefully, that will suffice, but we will see!
August 3, 2014 at 2:58 pm
[…] is one of our big summer projects. Can you tell? We’ve organized his stuffies and built a new desk but today, our project is to eliminate the wasted space in his closet. You know that side part of […]